

Cielo LIO Documentation
In this documentation you have access to all information about the Cielo LIO platform and good practices for the development and integration models available to complement your client’s business.
The purpose of this documentation is to make the development process easier, by providing the material required to perform the integration with the Cielo LIO and all concepts about Cielo Store, the Cielo app store available on Cielo LIO.
Platform’s Overview
Cielo LIO
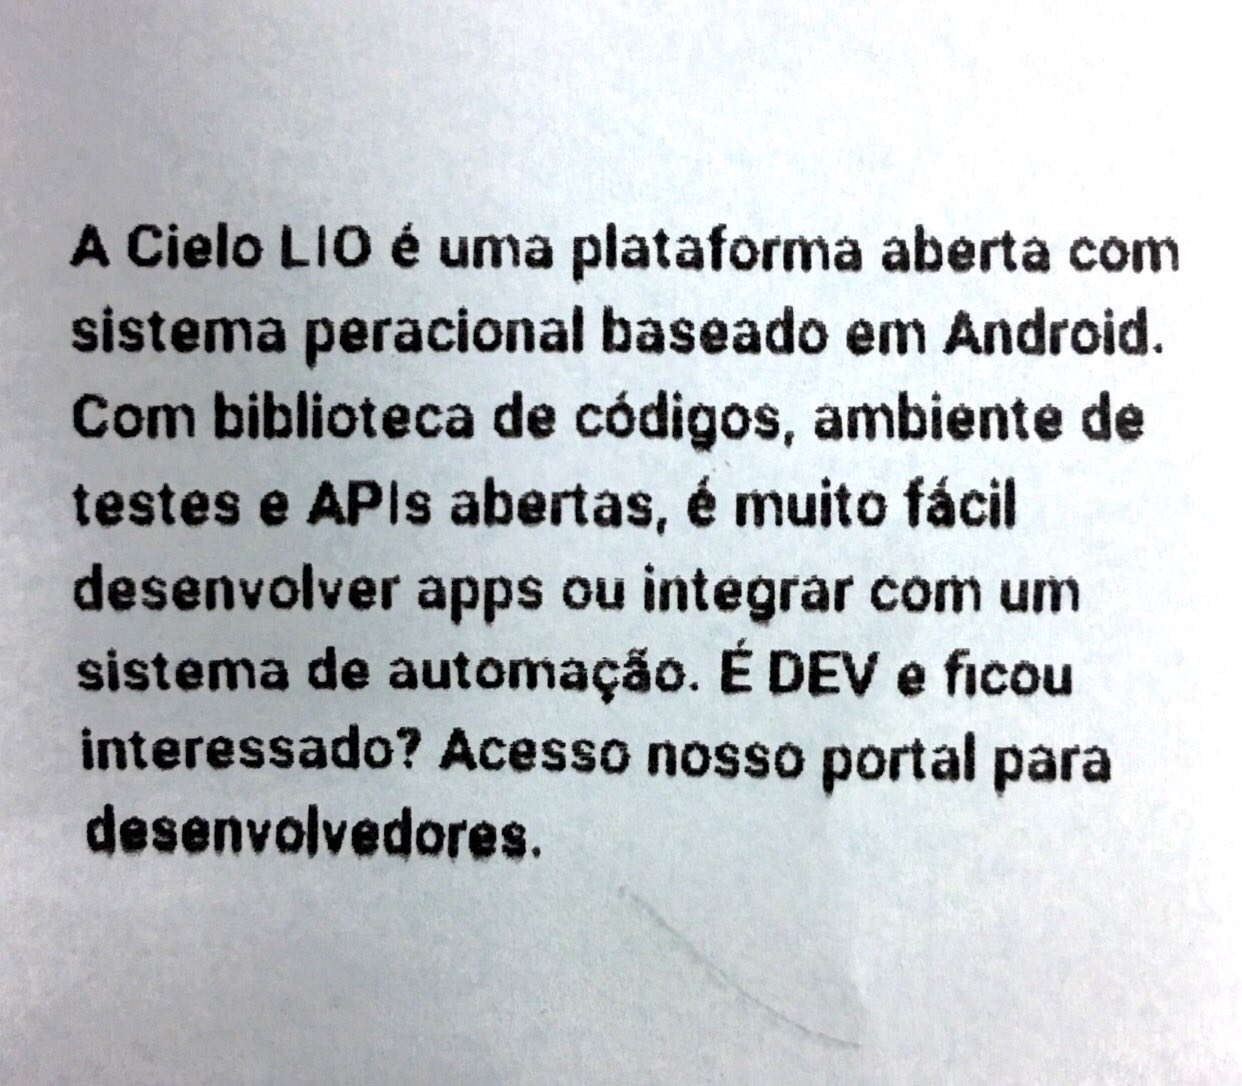
Cielo LIO is a platform that provides control and business management that goes beyond a traditional payment system. This platform supports applications developed for Android system, encouraging partner developers on creating especialized applications for several segments (restaurants, clothing, cosmetics, fuel and other) and, thus, allowing commercial establishments to chose the application that adapts better to their company business model.
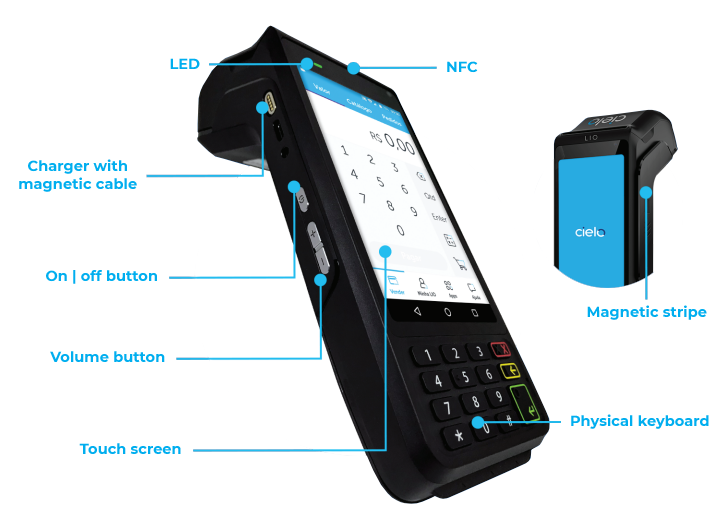
LIO v3 was conceived in a larger size and has some exclusive and additional functionalities, such as:
Thermal printer: the client will be able to have the 1st and 2nd hard copies after the performed payment. Besides, the partner applications will be able to use the printer available methods to print important or necessary data for the client’s business.
Roll Specification: Blue Paper 48 grams, Length: 12 meters, Maximum diameter: 30 millimeters, Width: 57 millimeters.
NFC: technology that allows the payment using cards with contactless technology.
Architecture
About
Cielo LIO platform is based on Android and consists in:
- An application store (Cielo Store) for developers to publish their applications and make them available for commercial establishments (retailers).
- A platform with cloud architecture and REST APIs that allows the integration to partners’ commercial automation systems. Access Remote Integration Documentation
- An SDK for development on Android, in a way that partners’ applications are able to integrate with the Cielo LIO payment functionalities. Access Local Integration Documentation
Models of integration with the Cielo LIO platform
Remote Integration | Cielo LIO Order Manager
set of APIs that allow the client to continue using his PDV / Commercial Automation solution with all the functionalities. At the moment of performing the payment, the integration with the Cielo LIO Orders Manager occur (Order Manager), in a fast, simple and safe way. Go to remote integration
Local Integration | Cielo LIO Order Manager SDK
Cielo provides an SDK based on Cielo Lio Order Manager API that allows the developer and Cielo LIO partner to integrate his application to the Cielo LIO functionalities. Go to local integration
Peripheral services
Cielo LIO also integrates to the following peripheral hardwares:
Bluetooth Printers
On the LIO V1 case, it is possible to connect Cielo with bluetooth printers to perform the printing of receipts and other important information.
There are partners that are already using Bluetooth printers from the brands Zebra, Datex, Leopardo integrated to Cielo LIO.
All communication protocols and pairing are under the partner’s application responsability.
RFID Readers
There are partners already using RFID readers in their solutions..
All communication protocols and pairing are under the partner’s application responsability.
Technical especifications of the Cielo LIO hardware
The Cielo LIO platform had its own operational system based on Android. Check the table below with the technical especifications of the Cielo LIO:
 |
 |
|
|---|---|---|
| Version | LIO V1 | LIO V2 |
| Operatinal System | Android OS Cielo 5.1.1 | Android OS Cielo 6.0 (Marshmallow) |
| Memmory | 2GB LPDDR3 | 2GB LPDDR3 |
| Dual Chip | Dual SIM Stand-by | - |
| SIM Card type | micro SIM (3FF) | micro SIM (3FF) |
| GSM Frequency in Mhz | Quad-Band 850/900/1800/1900 | Quad-Band 850/900/1800/1900 |
| Size in inches | 5” | 5.5” |
| Screen type | AMOLED | AMOLED |
| Screen resolution | 720 x 1280 pixels | 720 x 1280 pixels |
| Pixel density | 293 ppi | 267 ppi |
| Camera | 12.8 Mega Pixels | 13 Mega Pixels |
| Camera resolution | 4128 x 3096 pixels | 4160 x 3120 pixels |
| Flash | Flash LED | Flash LED |
| USB | USB 2.0 Micro-B (Micro-USB) Energy only | USB 2.0 Micro-B (Micro-USB) Energy only |
| Bluetooth | Version 4.0 com A2DP | Version 4.0 com A2DP/LE |
| WiFi | 802.11 a/b/g/n | 802.11 b/g/n |
| GPS | A-GPS. GeoTagging | A-GPS |
| Sensors | Accelerometer, Proximity e Luminosity | Accelerometer, Proximity e Luminosity |
| Audio Output | Audio Jack 3.5mm | Audio Jack 3.5mm |
| Weight | 363 g | 507 g |
| Height | 34mm | 46mm |
| Width | 84mm | 81mm |
| Length | 168mm | 228mm |
Screen rotation on Cielo LIO
The rotations on the displayed screen have different behavior between the Cielo LIO versions.
On LIO V1 the screen orientation is locked.
On LIO V2 it is possible to control the screen orientation. By standard, the displayed screen orientation is free and set according to the equipment accelerometer.
In case the developer wants to control and use in a customized way the Cielo LIO screen orientation, he’ll have to use it according to the Android documentation..
Official Android Documentation
Access the item: android:screenOrientation for more information.
Mobile Data on Cielo LIO
Cielo LIO already comes configured with a SIM Card. The SIM Card carrier is set according to the commercial establishment registered address.
Cielo sends the SIM Card of the best carrier according to the registered address of the LIO requested.
This SIM Card allows the connection with the 3G technology of Cielo LIO and has an unlimited data package.
Tips for developers
The guide below provides information necessary to help developers to integrate or develop their applications on Cielo Lio platform the best way possible, in a way to provide an excellent experience to the commercial establishments.
It is recommended the detailed reading of the Cielo LIO documentation present on the Developers Portal. This documentation gathers important information for moderate simplicity questions.
Best practices with the Cielo LIO platform
Data Security and Privacy
- Protect sensitive data from customers and employees. Do not expose names, addresses, or phone numbers publicly.
- Never expose authentication tokens or passwords of any kind.
- The partner must provide his support data so that the commercial establishments (retailers) contact in case of problems and/or questions.
Rate Limiting
- The Commercial Automation solicitations or PDV must be scaled to the max in order to avoid high traffic bursts.
- “Cache” your own data when you need to store specialized values or quickly revise large data sets.
- Do not create multi-thread with POST layers, this behavior can create systemics delays due to deadlocks.
- Minimize data usage. The commercial establishments (retailers) may be using a connection with limited mobile data.
Quality Code
Your application has to be in conformity with the Android and Java programming conventional practices according to the guidelines for Android developers.
- Object Oriented Design principles (S.O.L.I.D.).
- Java style guidelines.
- Understand the difference between
compileSdkVersion,targetSdkVersion, andminSdkVersion. - Enjoy the Android native buttons, like the “Back” and “Home” buttons.
- Optimize the operations seeking low battery consumption
- The application has to attend the Cielo commercial establishments (retailers) needs.
- Your application has to have a good end-to-end experience, assuring the correct communication between all fluxes, specially the Cielo LIO payment returns.
Image features
- The applications’ icons must be mimap features.
- The icons must be in conformity to the Android standard dimensioning (you can use third party icon generators to resize your logo): 192 × 192 (xxxhdpi).
Use and Usability
- We recommend that the developers integrate some kind of fail report utility in their Android products. It will help you on maintaining the operational awareness of your product.
- Developers can collect metrics about the use of your application. It will help them on building better products and rising the awareness about any impacting questions..
- Ensure that the application works optimally, avoiding that crash and delay occurs on the answer for application processing.
- The design must emphasize clarity and accessibility - high contrast, readable fonts, large text and inputs.
- Make the application’s acceptance terms clear and provide the necessary support to the user regarding the service provided.
- If you are adapting a developed application for another platform, check if it only includes features and buttons relevant to the Cielo LIO user.
- If your application includes a component designed to the customer, your project will reflect on the business using your application. These interfaces have to be pleasant and professional.
- It is recommended the use of the Material Design for development of the applications for Cielo LIO. This recommendation has the purpose of facilitating the use of good design practices for development of mobile applications.
- Your application will be used in working conditions of fast and dynamic pace. Strive to get clear work fluxes, easy to use and robust, with as few steps as possible.
Develop your application for Cielo LIO
Introduction
With Cielo LIO it is possible that companies and partners have your application running on Cielo platform. These applications may or not be integrated to the payment, it all will depend on the company or partner purposes.
Below, you’ll find all necessary information to develop an application for Cielo LIO.
Development Environment
It is required that you use an IDE (Integrated Development Environment) to develop your application. Cielo recommends that an IDE from Android Studio (version 2.2.2 or above) is used, seeking to assure the application operation on Cielo LIO platform.
For more details about the Android Studio instalation and configuration, click here
For the creation of a new project on Android Studio, click here
Programming Language
Cielo LIO accepts applications developed in Java or Kotlin..
We recommend that these languages are used to ensure that it works and to ensure the ease of integration with Cielo LIO.
Cielo OS
O sistema operacional da plataforma Cielo LIO foi personalizado e, com isso, surgiu o Cielo OS, que é baseado em Android.
Target version of the application
It is recommended that the developer uses Android 5.1.1 (Lollipop) as the application target version. Thus, it is assured the working of the application on the LIO V1 hardware as well as on LIO V2 hardware.
Unavailable Features
When customizing the Android of Cielo LIO, some features were removed to assure the peroformance and security of the platoform.
Below, the list of Cielo LIO removed features:
Google Play Services: All services, APIs and apps from Google were removed from the operational system. Consequently, it won’t be possible to use the libraries that depend on these Google features.
Componente Webview: This visual feature was removed with the purpose of ensuring the security on the platform and avoid that, from the installed applications on Cielo LIO, it is possible to access links and external contents.
Attention: Cielo does not allow that the application from the client/partner be developed using the WebView feature. This visual feature makes the Cielo LIO platform vulnerable. In case the application is using WebView, it won’t attend the certification parameters and it won’t be made available on Cielo Store.
Substitutes suggestions
Push-Notifications
Exclusive Google Services feature, therefore, it won’t be present on Cielo LIO.
Alternative: JobScheduler
Description: It’s an API to schedule several kinds of jobs against the structure that will be executed in the process of your application itself. Allowing in each time cycle that the application perform a search in our Backend services.
JobScheduler is the most indicated due to battery performance, without mentioning other options that it provides (Example: Job only runs when the smartphone is charging).
Reference: Click here
Location Services (GPS)
Exclusive Google Services feature, therefore it won’t be present on Cielo LIO.
Alternative: Location Manager
Description: This class provides access to the location services of the system. These services allow that applications get geographic position periodic updates from the device or start an specific Intention by the application when the device gets inside the proximity of a certain geographic location.
Reference: Click here
Map Services
Exclusive Google Services feature, therefore it won’t be present on Cielo LIO.
Alternative: MapBox
Description: An open source mapping platform for customized maps. Our APIs and SDKs are the construction blocks to integrate the location in any mobile or web application.
Reference: Click here
APKs Removed from Cielo OS
Below, there is a table with all APKs that were removed from Cielo OS and that, consequently, are not available for Cielo LIO:
| BasicSmsReceiver | FileManager | PhaseBeam |
| Browser | Galaxy4 | QuickSearchBox |
| Calculator | Gallery | SoundRecorder |
| Calendar | HoloSpiralWallpaper | SpeechRecorder |
| CalendarProvider | LiveWallpapers | Todos |
| CBMessageWidget | LiveWallpaperPicker | Videos |
| Contacts | MagicSmokeWallpapers | VisualizationWallpapers |
| ContactsCommon | MtkWeatherProvider | VoiceCommand |
| DataTransfer | Mms | VoiceDialer |
| Dialer | Music | VoiceExtension |
| MusicFX | VoiceUnlock | |
| Exchange2 | NlpService | WallpaperCropper |
| FMRadio | NoiseField |
Development Frameworks
Currently, Cielo LIO does not support applications developed in hybrid platforms, such as, Ionic, Titanium, Xamarin, CronApp and PhoneGap.
Dev Console
About
Dev Console is an exclusive environment for the developer to perform the upload and the management of applications developed for Cielo LIO.
On the Dev Console, the developer is able to view all of his published apps, whether they are own apps or public apps.
Access now the Dev Console: https://www.cieloliostore.com.br
LIO for Developers
Developers who wish to get a Cielo LIO, can perform the accreditation on Cielo and request the equipment. The procedure can be performed via Cielo website.
After getting the Cielo LIO, the developer will have to contact via Developers Portal channel and request the enabling of your LIO to the Dev LIO, filling the required information.
An account on the Dev Console is required to perform this request.
Our team will perform the required procedures and then, all applications published by the developer that are on Developed status will be able to be downloaded on your Cielo LIO of development.
Click here to request the enabling of your LIO to the Dev LIO.
Public Store
The Public Apps are indicated to the developers and partners that wish to scale and make their apps available, to allow the download in all Cielo LIO equipments distributed on the commercial establishments (retailers) in Brazil via Cielo Store app.
To learn more about Cielo Store, Click here
Upload of new Public Apps and new versions
To perform the upload of new public apps, access the Dev Console and add a new app by selecting the public store option and after that, select the app file.
In case the developer is performing a change or update in a public app, the developer will have to perform the upload of a new app version. For that, click in Details of your app and start the procedure to add a new version.
To send a new app version, it is mandatory to:
-
Ensure that the most recent version has the same package name as the previous one;
-
Change the “version code” and the “version name” within the manifest file of the application.
Public Apps on Cielo Store
As soon as the public app is certified, the developer will have to promote his app for production and from that moment, the app will be added to the Cielo Store showcase and will be available for download via Cielo LIO.
That is, commercial establishments (retailers) will be able to access Cielo Store via Cielo LIO, download your app and then start using.
Download of Public Apps on Cielo LIO
To perform the download of Public Apps on Cielo LIO, perform the following procedure: Click on the Apps tab -> Click on the Cielo Store app -> Choose the app that you want to download
Private Store
The private store was a model created to allow the distribution of own applications developed by the partner. It is required to request the creation of the Private Store so that it is possible to upload an own app on the Dev Console.
Click here to request the creation of the Private Store.
From the created Private Store, the developer will be able to publish his application on the Dev Console, selecting his private store.
The private store is essential for making the distribution of own apps to specific retailers.
Apps Certification
The purpose of the apps certification is to ensure that all the applications present on Cielo LIO platform, are own or public, and are in agreement to the rules and criteria established by Cielo.
The apps certification from Cielo LIO seeks to ensure that:
- The payment flux works correctly
- The content on the applications do not violate Cielo rules
- The SKUs of the products are sent correctly
- The information to the Cielo Store showcase are filled correctly, exclusive for Public Apps
Error Messages
The table represents the possible errors that the developer might find during the Dev Console utilization:
| Reference | Message | Scenario | What to do? |
|---|---|---|---|
| APP CREATED_ERROR | App with that package name already exists | The developer tried to send an application with a package name already existent on the store. | Change on the Manifest file, the Package Name of the application. |
| APP APK_PARSER_ERROR | The .apk file is mandatory | The developer tried to perform the upload of an application and didn’t attach the .apk file | Click on the button “Add an APK” and make sure that the right file was chosen. |
| APP APK_PARSER_ERROR | It wasn’t possible to get the Name attribute / It wasn’t possible to get the Package Name attribute / It wasn’t possible to get the Version Name attribute / It wasn’t possible to get the Version Code attribute | The developer tried to perform an upload of an app where the manifest file or apk file is corrupted or he has problems on the manifest file configuration | Rebuild the apk and verify if there are no error on the Manifest file from Android |
| SCREENSHOTS CREATED_WARNING | App created, however the screenshots weren’t saved! | On the app creation, the Developer sent screenshots where image files have unusual or unknowns extensions. | Edit the app and send the image files with known extensions. |
| SCREENSHOTS UPDATED_WARNING | App updated, however the the screenshots weren’t saved! | On the app editing, the Developer sent the screenshots where the image file has unusual or unknown extensions. | Edit the app again and send image files with known extensions. |
| VERSION PROMOTE_ERROR (this scenario only occurs with public apps) | It is required a registered CE to promote this version for production. | After the application had its certification approved, the Developer tried to promote the app for production, however, still doesn’t have a CE. | Request Cielo the creation of a CE to be able to promote the application for promotion. |
In case the developer doesn’t find the error in this table open a ticket to the support team, reporting the problem found and remember to list the evidences of the error with screenshots and error messages received.
Promote App for Production
As soon as the application is approved on the certification, the developer will receive a notifying email and then, he’ll have to promote his app for production in a way that it gets:
- Available for download on Cielo Store (Public App)
- Available for distribution to specific retailers (Own App)
Status of an application
All applications published on the Dev Console have the following status:
1 - Development
Nesse estágio o desenvolvedor consegue realizar testes do seu aplicativo em uma Cielo LIO. E caso precise fazer alguma correção, basta publicar uma nova versão do aplicativo pelo Dev Console e então atualizar na Cielo LIO.
In this stage, the developer is able to perform tests of his application in a Cielo LIO. In case he needs to correct something, just publish a new version of the application using the Dev Console, and then request the enabling to Dev LIO.
2 - Certification
Once the tests are finished, the developer sends the application for Certification. In this stage, the Cielo Certification team will take action and validate the functioning flux of the application, mainly on the steps integrated to the payment.
3 - Production
As soon as the application is approved on the certification, the developer will be able to promote for production.
In case the Public Application in production, it will be available for download on Cielo Store.
In case of Own Application, the developer will have to request the distribution to the LIOs that must receive your app.
Cielo App Data
With Cielo App Data API, the developer of an app will be able to have access to the purchase information of his apps in a given LIO terminal.
Token Generation
For such, it is required, previously, to generate the Token API on the Dev Console, which will be used on the App Data API. To generate the token, follow the step by step below:
- Access and log in on the Dev Console through the link
- On the Public apps tab, select the desired App
- Click on the Token API tab, and then on the Generate Token button.
- Once generating the token, copy and save it.
Endpoint: https://cieloliostore-api.m4u.com.br/api/v1/me
HTTP Headers
All Cielo App Data API calls need that the Token API generated on the Dev Console is present on the requisitions Header:
- Token: Access-token identification, that stores information from the Public App that desires information.
HTTP Query Parameters
Complementing the requisitions Header, the Cielo App Data API needs that all calls have the CE (Commercial Establishment Number) and the Logic Number (LIO terminal identifier) in its requisitions:
- ce: Commercial Establishment Identification desired for query.
- logic_number: LIO Terminal Identification desired for query.
API
GET / Details of a product
ec (required in query parameter) - “String” logic_number (required in query parameter) - “String” token (required in header) - “String”
Answer example:
{
    "app": {
      "name": "string",
      "package_name": "string"
    },
    "purchase": {
        "status": "SUBSCRIBED",
        "plan": {
            "id": "string",
            "name": "string",
            "value": 0
        },
        "created_at": "string"
    },
    "payment": {
        "status": "PENDING"
    }
}
Return options by field
| purchase.status: “SUBSCRIBED” | “UNSUBSCRIBED” | ||||
| payment.status: “PENDING” | “AT_RECURRENCE” | “PAID” | “OBLIGOR” | “CANCELED” | “CIELO_PURCHAASE” |
purchase.status: “SUBSCRIBED” purchase.status: “UNSUBSCRIBED”
payment.status: “PENDING” (Pagamentos com status pendente) payment.status: “AT_RECURRENCE” (Pagamentos com status em recorrência) payment.status: “PAID” (Pagamentos com status pago) payment.status: “OBLIGOR” (Status do pagamento como inadimplente) payment.status: “CANCELED” (Pagamentos cancelados) payment.status: “CIELO_PURCHASE” (pagamentos isentos(compras de teste/desenvolvimento))
Local Integration
Presentation
The purpose of the Local Integration from Cielo LIO is to allow that the developed application in Android is integrated to the orders and payment module from Cielo LIO through Cielo LIO Order Manager SDK.
In this integration model, all commercial establishment management and solution architecture are under the responsibility of the application that will use the SDK on the payment operation.
- The partner’s application running on Cielo sends information to Cielo LIO Order Manager SDK.
- Cielo LIO Order Manager SDK runs the fluxes to payment.
- The partner’s application gets notifications of the payment and continues its execution.
The sections below have all the informations required to perform the integration in a fast and safe way.
Cielo Lio Order Manager SDK
About
Cielo LIO Order Manager SDK is an Android library developed based on Cielo LIO Order Manager API, encapsulating the REST communication complexity in an API thats is fluent and friendly to the developer and allowing a simple, fast and safe integration to the Cielo LIO platform.
The main purpose of Cielo LIO Order Manager SDK is to simplify the integration to the payments system and allow that the developer focus efforts on the development of his application’s characteristics. Below, it is presented an exemple in high-level of the Cielo LIO Order Manager SDK utilization process by a partner application:
- The partner application is responsible for managing all the order informations, and then, send them to Cielo LIO Order Manager SDK.
- Cielo LIO Order Manager SDK receives the informations and the payment flux for the costumer. In this flux, the costumer will select the payment method and enter the password on the Pinpad, having the possibility to send the payment voucher via e-mail.
- By the end of the payment flux, the partner application receives all information about the payment performed and goes back on running on the Cielo LIO screen.
For more information and details about the development of an application for Cielo LIO, access the documentation Develop an App for LIO..
Sandbox Environment - Emulator
This application works like a proxy from all calls that the SDK would send LIO. It simply treats these calls and emulates the possible types of return to the costumer’s application, allowing that the developer performs the tests on the SDK methods and perform the debug of the application during the development and the integration to Cielo LIO Order Manager SDK, without the need of having a Cielo LIO hardware.
It’s not even required to let this app opened. As soon as the customer application use an OrderManager function that would call LIO, the application gets in first plan for the selection of what must be returned (Success, Error or Cancellation)
Download the emulator .apk on the link below:
To install the application, just follow the following steps:
- Access the configurations of your device and go to the “Security” menu;
- Locate the “Unknown Sources” item, on the “Device administration” section
- Touch the key on the side and confirm your choice to start allowing the installation of APK files downloaded by alternative sources.
Configure modules and dependencies
After configuring a new project on Android Studio, it is required to include the dependency below on the project.
For release version, add the module from Cielo LIO Manager SDK on the Gradle dependencies:
compile 'com.cielo.lio:order-manager:0.19.5'
last version 0.19.4 - launched in 25/07/2018
From the version 1.17.7-beta of the SDK, it has become required the permission of INTERNET on the costumer application. Add this permission to the
AndroidManifest.xmlof your application.
Credentials
To use Cielo LIO Order Manager SDK, it is required to insert the following credentials on the OrderManager initialization:
Credentials credentials = new Credentials("Your client id here", "Your accessToken here");
-
Client-Id Its generation occurs at the moment of the creation by the developer panel. Its value can be viewed on the Client ID column, within the menu ‘Developer’ -> ‘Registered Client ID’.
-
Access-Token Access-token identification, that stores the access rules allowed to the Client ID. Its generation occurs at the moment of the Client ID creation by the developer panel. Its value can be viewed by clicking in “details” on the ‘Access Tokens’ column, within the menu ‘Developer’ -> ‘Registered Client ID’.
Orders Creation and Management
The basic flux for the SDK utilization can be divided in 4 steps, as on the diagram below:

Below, we’ll show how to perform each of these steps.
Create OrderManager
This method allows starting the OrderManager, that is responsible for the main Cielo LIO Order Manager SDK operations. The OrderManager represents the interface with the Order Manager REST API.
It all starts with the OrderManager creation!
OrderManager orderManager = new OrderManager(credentials, context);
The OrderManager constructor gets 2 parameters:
| Attribute | Description | Domain |
|---|---|---|
| credentials | Access credentials of the Partner/Developer. After registering on the Developers Portal and creating his app, the Partner/Developer gets the (Client-ID and Access-Token) credentials. They are for identifying him uniquely on LIO platform and to differentiate the orders of his application. | cielo.sdk.order.Credentials |
| context | The application context. | android.content.Context |
Attention: We recommend creating/initializing OrderManager on the partner’s application at the moment that you’ll use the functionalities, looking to optimize the application performance
Link the application context to the SDK
With the bind() method, it is possible to link the application context to the SDK. This service is responsible for managing the functions related to the orders from LIO.
ServiceBindListener serviceBindListener = new ServiceBindListener() {

    @Override public void onServiceBoundError(Throwable throwable) {
        //There was an error while trying to connect to the OrderManager server
    }

    @Override
    public void onServiceBound() {
        //You have to ensure that your application connected to LIO from this listener.
        //From this moment, you can use the OrderManager functions, otherwise an exception will be launched.
    }

    @Override
    public void onServiceUnbound() {
        // The service was unlinked
    }
};

orderManager.bind(context, serviceBindListener);
Attention: You have to ensure that the
onServiceBound()listener was called before using the OrderManager functions, otherwise an exception will be launched, causing a crash in your application.
Bind method gets two parameters:
-
context: object that will provide the context in which the service will be linked..
-
serviceBindListener: listener that notifies the connection state with the OrderManager service.
With the OrderManager initialized and after the onServiceBound method execution, it becomes possible to go to the next step and create an order (Order class).
Create an order
Cielo LIO works with the Order (order) concept. It is required to have an order to, then, perform the payment(s).
This method allows creating an Order (Order class). To perform this creation, use the createDraftOrder method, that will make available an Order with DRAFT status:
Order order = orderManager.createDraftOrder("ORDER_REFERENCE");
Add items in an order
This method allows that items are added in an order.
Attention: It is required to add at least an item to an order so that it is possible to continue with the payment.
// Product identification (Stock Keeping Unit)
String sku = "2891820317391823";
String name = "Coca-cola can";

// Unit price in cents
int unitPrice = 550;
int quantity = 3;

// Measure unit of the product String
unityOfMeasure = "UNIT";

order.addItem(sku, name, unitPrice, quantity, unityOfMeasure);
Release order to payment
This method allows updating the status of an order and release it to payment. The purpose is to use this method after adding all items on the order.
orderManager.placeOrder(order);
After the execution of this method, the Order status will change from DRAFT to ENTERED, allowing that it gets paid.
Attention: It is important to notice that, once an Order changes status to ENTERED, it will no longer be possible to include any items on it. Start payment process
This method allows starting the payment process on Cielo LIO.
Payment Process
Are available some ways to call the checkoutOrder method:

Independently on the chosen way, you’ll have to use the following callback as parameter of the checkoutOrder() method to receive the states related to the payment:
PaymentListener paymentListener = new PaymentListener() {
    @Override
    public void onStart() {
        Log.d("SDKClient", "Payment has started.");
    }

    @Override
    public void onPayment(@NotNull Order order) {
        Log.d("SDKClient", "A payment was performed.");
    }

    @Override public void onCancel() {
        Log.d("SDKClient", "The operation was canceled.");
    }

    @Override public void onError(@NotNull PaymentError paymentError) {
        Log.d("SDKClient", "There was an error on the payment.");
    }
};
PaymentListener: A callback that informs about all actions taken during the payment process. The following actions can be notified:
• onStart - When a payment is started. • onPayment - When a payment is performed. Notice that an order may be paid by more than one payment. • onCancel - When the payment is canceled. • onError - When there’s an error on the order payment.
The onPayment() method returns an Order object with a list of Payment that has a PaymentFields HashMap with most of the transaction data.
Below there’s a table with the most relevant data existing in this map:
| Payment Fields - (Payment object attribute) | ||
|---|---|---|
| Field Name | Field Description | Example Value |
| clientName | Holder’s name | VISA ACQUIRER TEST CARD 03 |
| hasPassword | Validate if the operation has requested password | true |
| primaryProductCode | Primary product code | 4 |
| primaryProductName | Primary product name | CREDIT |
| upFrontAmount | Up front amount | 2500 |
| creditAdminTax | Credit administration tax value | 0 |
| firstQuotaDate | Debit date from the first installment | 12/25/2018 (dd/MM/yyy) |
| externalCallMerchantCode | Commercial Establishment Number | 0010000244470001 |
| hasSignature | Validate if the operation has requested signature | false |
| hasPrintedClientReceipt | Validate if it has printed the client receipt | false |
| applicationName | Application package | cielo.launcher |
| interestAmount | Interest amount | 5000 |
| changeAmount | Change amount | 4500 |
| serviceTax | Service Tax | 2000 |
| cityState | City - State | Barueri - SP |
| v40Code | Transaction type | 5 (Lista de Tipos de transação abaixo) |
| secondaryProductName | Secondary product name | PARC. ADM |
| paymentTransactionId | Payment transaction ID | 98437.29102507174 |
| pan | Tokenized card number (6 first digits - 4 last digits) | 476173-0036 |
| originalTransactionId | Original transaction ID, on the cancellation cases | “0” |
| cardLabelApplication | Kind of application used by the card on the transaction | VISA CREDIT |
| secondaryProductCode | Secondary product code | 205 |
| documentType | (J) = Legal person (F) = Physical Person | J |
| statusCode | Transaction1 status - Authorized 2 - Canceled | 1 |
| merchantAddress | Commercial establishment (retailer) address | Graja avenue, 219 |
| merchantCode | Commercial establishment number | 0010000244470001 |
| hasConnectivity | Validates if it was an online transaction | true |
| productName | Compiled payment way | ADM INSTALLMENT CREDIT - I |
| merchantName | Commercial establishment trading name | ON STORE |
| firstQuotaAmout | First installment amount | 0 |
| cardCaptureType | Code of the card capture type | 0 (Capture Types list below) |
| requestDate | Requisition date in milliseconds | 1293857600000 |
| boardingTax | Boarding tax | 1200 |
| applicationId | Package of application | cielo.launcher |
| numberOfQuotas | Number of installments | 2 |
| Capture Types List | |
|---|---|
| Código | Value |
| 0 | Transaction with a chip card |
| 1 | Entered transaction |
| 2 | Transaction with stripe card |
| 3 | Transaction with contactless card |
| Transactions type list - (This is not valid as an primary code) | |
|---|---|
| Code | Value |
| 4 | Credit in one lump sum |
| 5 | Administrative installment credit |
| 6 | Store installment credit |
| 7 | Pre authorization |
| 8 | Debit in one lump sum |
| 9 | Pre dated debit |
| 10 | Credit sale |
| 11 | Credit simulation |
| 13 | Meal voucher/food voucher |
| 28 | Sale cancellation |
All financial values are informed without comma, that is 2500 are equivalent to R$ 25,00.
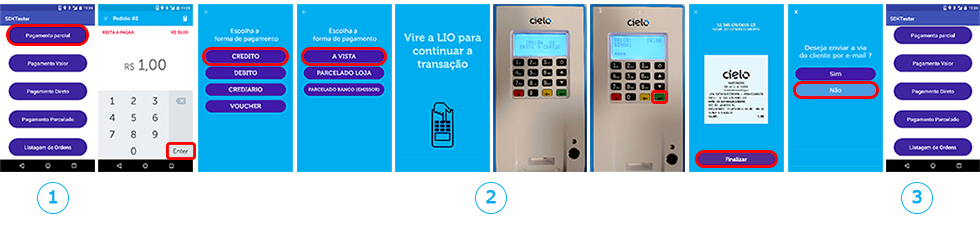
1. Partial Payment
On the Partial Payment, the payment amount is informed inside the Cielo LIO screen flux. In sequence, the Cielo LIO payment flux is initiated (define the amount to be paid, choose the payment way, insert the card, enter the password and view and/or send via e-mail the receipt).
orderManager.checkoutOrder(orderId, paymentListener);
In this payment eway, it is only required to perform the call of the method sending the follow parameters:
| Attribute | Description | Domain |
|---|---|---|
| orderId | The identifier of the order to be paid. | String |
| paymentListener | Payment callback. | cielo.sdk.order.payment.PaymentListener |
Flux of the transaction using the Cielo LIO partial payment
Below, there’s an example of the flux with the screens displayed during the partial payment:

2. Amount payment
On the Amounts payment, the amount to be paid is informed by the application and the payment way. (credit, debit, installment) is chosen within the Cielo LIO screen flux.
orderManager.checkoutOrder(orderId, value, paymentListener);
In this payment way it is possible to send any amount to be paid (total value or partial value of the order), it all depends on the business model adopted by the partner’s application. To perform the call, it is required to send the following parameters:
| Attribute | Description | Domain |
|---|---|---|
| orderId | The identifier of the order to be paid. | String |
| value | Amount to be paid. R$ 10,00 must be sent as 1000. | Long |
| paymentListener | Payment callback. | cielo.sdk.order.payment.PaymentListener |
Flux of the transaction using the amount payment from Cielo LIO
Below, there is an example of the flux with the displayed screens during the amount payment.:

3. Direct payment
On the Direct Payment, the amount to be paid and the payment way (credit, debit, installment) will be set within the partner’s application. In sequence, the Cielo LIO payment flux is initiated (insert the card, enter the password and view and/or send via e-mail the receipt).
Payment codes
To perform the direct payment, it is required firstly, to verify the payment types enabled for Cielo LIO from the commercial establishment using the query function below:
ArrayList<PrimaryProduct> paymentTypes = orderManager.retrievePaymentType();
This function will provide a list of objects from the PrimaryProduct type, where it will be possible to retrieve the enable payment codes.
The following fields will be returned by this function:
| Attribute | Description | Domain |
|---|---|---|
| id | Code identifier on the system. | Long |
| code | Used on the payment function. | String |
| name | Payment method name for display purposes. | String |
| secondaryProducts | Listing of secondary payment codes. Example: One lump sum, Installment, etc. | ArrayList<SecondaryProduct> |
With the payment codes available for the Cielo LIO of the commercial establishments, just perform the call of Direct Payment, informing the codes of the products:
PrimaryProduct primaryProduct = paymentTypes.get(0);
SecondaryProduct secondaryProduct = primaryProduct.getSecondaryProducts().get(0);

String primaryCode = primaryProduct.getCode();
String secondaryCode = secondaryProduct.getCode();

orderManager.checkoutOrder(orderId, primaryCode, secondaryCode, paymentListener);
Attention: On the version 0.19.0 of the SDK, there were introducted payment codes for the main operations provided on LIO, thus making the payment calls easier. It is important to emphasize that the payment ways are configured according to the commercial establishment, and not all will be available in all terminals. In case the selected payment method is not available on the LIO, there will be an excepetion of
NoSuchElementExceptiontype.
| PaymentCode |
|---|
| DEBITO_AVISTA |
| DEBITO_PREDATADO |
| DEBITO_PAGTO_FATURA_DEBITO |
| CREDITO_AVISTA |
| CREDITO_PARCELADO_LOJA |
| CREDITO_PARCELADO_ADM |
| CREDITO_PARCELADO_BNCO |
| CARTAO_LOJA_AVISTA |
| CARTAO_LOJA_PARCELADO_LOJA |
| CARTAO_LOJA_PARCELADO |
| PRE_AUTORIZACAO |
| VOUCHER_ALIMENTACAO |
| VOUCHER_REFEICAO |
| VISAVALE_REFEICAO |
| VISAVALE_ALIMENTACAO |
| FROTAS |
| PIX (IN PILOT) |
Attention: The use of the paymentCode referring to PIX will be available for use in version 1.7.0 of the SDK and will be released for use at the beginning of December/2023. This payment method must be enabled with Cielo.
In this payment way it is possible to send any amount to be paid and the payment way. To perform the call it is required to send the following parameters:
| Attribute | Description | Domain |
|---|---|---|
| orderId | Identifier of the order to be paid. | String |
| value | Amount to be paid. R$ 10,00 must be sent as 1000. | Long |
| primaryCode | Identifier code of the primary method of payment. example: Debit, Credit. | String |
| secondaryCode | Identifier code of the secondary method of payment. example: In one lump sum, Installment. | String |
| installments (not mandatory) | Number of installments. | Long |
| email (not mandatory) | E-mail informed. | String |
| paymentListener | Payment callback. | cielo.sdk.order.payment.PaymentListener |
Flux of the transaction using the direct payment from Cielo LIO
orderManager.checkoutOrder(orderId, value, primaryCode, secondaryCode, paymentListener);
ou
orderManager.checkoutOrder(orderId, value, paymentCode, paymentListener);
Below, there’s an example of the flux with the displayed screens during the direct payment:

4. Installment payment
To perform an installment payment, it is required to query the payment ways using the function provided on the SDK, mandatorily choose credit on the primary product and credit on the secondary product and inform the number of installments at the moment of the checkout. It is important to remember that if the payment codes are incorrectly informed or if the number of installments is not bigger than 0, the system will accuse error. In this payment way, it is only required to perform the call of the method sending the following parameters:
| Attribute | Description | Domain |
|---|---|---|
| orderId | The identifier of the order to be paid. | String |
| value | Amount to be paid. R$ 10,00 must be sent as 1000. | Long |
| primaryCode | Identifier code of the primary method of payment example: Debit, Credit. | String |
| secondaryCode | Identifier code of the secondary method of payment example: One lump sum payment, Installment. | String |
| installments | Number of installments. | Long |
| paymentListener | Payment callback. | cielo.sdk.order.payment.PaymentListener |
Flux of the transaction using the installment payment from Cielo
orderManager.checkoutOrder(orderId, value, primaryCode, secondaryCode, installments, paymentListener);
ou
orderManager.checkoutOrderStore(orderId, value, installments, paymentListener);
ou
orderManager.checkoutOrderAdm(orderId, value, installments, paymentListener);
Below there’s an example of the flux with the screens displayed during the installment payment:

5. Payment informing the e-mail
In this case, it is possible to inform the e-mail to make the filling easier when you send the receipt to the costumer. In this payment way, it is only required to perform the call of the method using the following parameters:
| Attribute | Description | Domain |
|---|---|---|
| orderId | The identifier of the order to be paid. | String |
| value | Amount to be paid. R$ 10,00 must be sent as 1000. | Long |
| primaryCode | Identifier code of the primary method of payment example: Debit, Credit. | String |
| secondaryCode | Identifier code of the secondary method of payment example: One lump sum payment, Installment. | String |
| installments | Number of installments. | Long |
| E-mail informed | String |
|
| paymentListener | Payment callback | cielo.sdk.order.payment.PaymentListener |
Flux of the transaction using the direct payment from Cielo LIO
orderManager.checkoutOrder(orderId, value, primaryCode, secondaryCode, installments, email, paymentListener);
Below there’s an example of the flux with the screens displayed during the payment with e-mail:
6. Payment informing CE
This method, it is provided for the case of being necessary to effect a payment in a CE different from the main one. The CE informed must be configured on Cielo LIO at the moment of initialization for it to work, or the SDK will send an exception of InvalidParameterException type.
In this payment way, it is only required to perform the call of the method sending the following parameters:
| Attribute | Description | Domain |
|---|---|---|
| orderId | The identifier of the order to be paid. | String |
| value | Amount to be paid. R$ 10,00 must be sent as 1000. | Long |
| primaryCode | Identifier code of the primary method of payment example: Debit, Credit. | String |
| secondaryCode | Identifier code of the secondary method of payment example: One lump sum payment, Installment. | String |
| installments | Number of installments. | Long |
| E-mail informed | String |
|
| merchantCode | CE number | String |
| paymentListener | Payment callback | cielo.sdk.order.payment.PaymentListener |
Flux of the transaction using the direct payment from Cielo LIO
orderManager.checkoutOrder(orderId, value, primaryCode, secondaryCode, installments, email, merchantCode, paymentListener);
or
orderManager.checkoutOrder(orderId, value, paymentCode, installments, email, merchantCode, paymentListener);
Below there’s an example of the flux with the screens displayed during the payment with CE:
Cancellation
There are two ways of cancelling the payment on Cielo LIO:
Cancel Part of the Payment Amount
Independently on the chosen way, you’ll have to use the following callback as parameter of the cancelOrder() method to receive the states related to the payment:
CancellationListener: A callback that informs about all actions taken during the cancellation process. The following actions can be notified: • onSuccess - When a cancellation is successfully performed. • onCancel - When the user cancels the operation. • onError - When there’s an error on the order cancellation.
CancellationListener cancellationListener = new CancellationListener() {
    @Override
    public void onSuccess(Order cancelledOrder) {
        Log.d("SDKClient", "The payment was canceled.");
    }

    @Override
    public void onCancel() {
        Log.d("SDKClient", "The operation was canceled.");
    }

    @Override
    public void onError(PaymentError paymentError) {
        Log.d("SDKClient", "There was an error on the cancellation");
    }
});
Cancel Total Payment
In the Cancel a Payment method, it is required to have saved an instance of the Order that contains the Order informations. This Order can be retrieved on the payment callback success or using the Order (Orders) Listing method (link to the method). As soon as you get the Order instance, use the method below passing the parameter as on the example below:
orderManager.cancelOrder(context, orderId, payment, cancellationListener);
Below it is detailed each of the parameters sent on the method:
| Attribute | Description | Domain |
|---|---|---|
| context | Context of your application. | String |
| orderID | The identifier of the order to be paid. | Long |
| payment | The payment to be canceled. | cielo.sdk.order.payment.Payment |
| cancellationListener | Callback that informs about all actions taken during the cancelling process. | cielo.sdk.order.payment.CancellationListener |
Cancel part of the value of a payment
In the method Cancel part of a value of a Payment, it is required to have saved an Order instance that contains the Order informations. This Order can be retrieved on the payment callback success or using the Order (Orders) Listing method. The parameters from the previous method, with the inclusion of a parameter that is the amount to be canceled.
In this scenario you must be careful not to pass a value greater than the payment, otherwise the system will return an error.
Therefore, as soon as you get the Order instance, use the method below passing the parameters, as on the example below:
orderManager.cancelOrder(context, orderId, payment, value, cancellationListener);
Below it is detailed each of the parameters sent on the method:
| Attribute | Description | Domain |
|---|---|---|
| context | Context of your application. | String |
| orderID | The identifier of the order to be paid. | Long |
| payment | The payment to be canceled. | cielo.sdk.order.payment.Payment |
| value | The amount to be canceled. | Long |
| cancellationListener | Callback that informs about all actions taken during the cancelling process. | cielo.sdk.order.payment.CancellationListener |
Example of JSON returned in the CancellationListener’s OnSucess() listener.
{
	"createdAt":"2023-11-03T10:28:52.164Z",
	"id":"0f156449-6c77-47aa-88b7-da98edaefc16",
	"items":[
		{
			"description":"",
			"details":"",
			"id":"7243e387-d73a-4f70-bc9b-8b39e1e1f90a",
			"name":"TESTE",
			"quantity":1,
			"reference":"",
			"sku":"0000000000",
			"unitOfMeasure":"UN",
			"unitPrice":"10"
		}
	],
	"notes":"",
	"number":"",
	"paidAmount":"0",
	"payments":[
		{
			"accessKey":"BoV29dYpLriYeTdpSOOHXJOWSvQpU8Srt97xlGzwj8bkPChegC",
			"amount":"10",
			"applicationName":"pdv.teste",
			"authCode":"285565",
			"brand":"VISA",
			"cieloCode":"74356",
			"description":"",
			"discountedAmount":"0",
			"externalId":"e9c93039-3212-4f25-b571-2c57c0259e5b",
			"id":"8083f635-13f4-48e4-9565-3876990d5f93",
			"installments":"0",
			"mask":"******0759",
			"merchantCode":"0000701260460001",
			"paymentFields":{
				"upFrontAmount":"0",
				"creditAdminTax":"0",
				"firstQuotaDate":"0",
				"hasSignature":"false",
				"hasPrintedClientReceipt":"false",
				"hasWarranty":"false",
				"interestAmount":"0",
				"serviceTax":"0",
				"cityState":"SAO PAULO SP",
				"hasSentReference":"false",
				"cardLabelApplication":"CREDITO         ",
				"originalTransactionId":"0",
				"originalTransactionDate":"03/11/23",
				"hasConnectivity":"true",
				"productName":"CREDITO A VISTA",
				"finalCryptogram":"74507261AE81C147",
				"entranceMode":"691017207380",
				"firstQuotaAmount":"0",
				"cardCaptureType":"3",
				"requestDate":"1699018133112",
				"boardingTax":"0",
				"numberOfQuotas":"0",
				"isDoubleFontPrintAllowed":"false",
				"bin":"481135",
				"hasPassword":"false",
				"isExternalCall":"true",
				"primaryProductCode":"1000",
				"primaryProductName":"CREDITO",
				"isOnlyIntegrationCancelable":"false",
				"receiptPrintPermission":"1",
				"isFinancialProduct":"true",
				"applicationName":"teste.pdv",
				"changeAmount":"0",
				"v40Code":"4",
				"paymentTransactionId":"e9c93039-3212-4f25-b571-2c57c0259e5b",
				"secondaryProductName":"A VISTA",
				"avaiableBalance":"0",
				"typeName":"VENDA A CREDITO",
				"pan":"******0759",
				"secondaryProductCode":"1",
				"hasSentMerchantCode":"false",
				"documentType":"J",
				"merchantAddress":"AV TESTE 200",
				"statusCode":"1",
				"merchantCode":"0000000000",
				"paymentTypeCode":"1",
				"merchantName":"TESTE",
				"totalizerCode":"10",
				"applicationId":"cielo.launcher",
				"document":"58731662000111"
			},
			"primaryCode":"1000",
			"requestDate":"1699018133112",
			"secondaryCode":"1",
			"terminal":"00876192"
		},
		{
			"accessKey":"",
			"amount":"10",
			"applicationName":"pdv.teste",
			"authCode":"285565",
			"brand":"VISA",
			"cieloCode":"74362",
			"description":"",
			"discountedAmount":"0",
			"externalId":"e5cb2957-3a4d-49af-be33-e99d6ae5c806",
			"id":"7ff66130-4836-4d58-9d9f-12a57a2b630d",
			"installments":"0",
			"mask":"******0759",
			"merchantCode":"00000000000000",
			"paymentFields":{
				"upFrontAmount":"0",
				"creditAdminTax":"0",
				"firstQuotaDate":"0",
				"hasSignature":"false",
				"hasPrintedClientReceipt":"false",
				"hasWarranty":"false",
				"interestAmount":"0",
				"serviceTax":"0",
				"cityState":"SAO PAULO SP",
				"hasSentReference":"false",
				"cardLabelApplication":"CREDITO         ",
				"originalTransactionId":"74356",
				"originalTransactionDate":"03/11/23",
				"hasConnectivity":"true",
				"productName":"CREDITO A VISTA",
				"entranceMode":"691017207380",
				"firstQuotaAmount":"0",
				"cardCaptureType":"3",
				"requestDate":"1699018209429",
				"boardingTax":"0",
				"numberOfQuotas":"0",
				"isDoubleFontPrintAllowed":"false",
				"bin":"481135",
				"hasPassword":"false",
				"isExternalCall":"true",
				"primaryProductCode":"1000",
				"primaryProductName":"CREDITO",
				"isOnlyIntegrationCancelable":"false",
				"receiptPrintPermission":"1",
				"externalCallMerchantCode":"0000000000",
				"isFinancialProduct":"true",
				"applicationName":"teste.pdv",
				"changeAmount":"0",
				"v40Code":"28",
				"paymentTransactionId":"e9c93039-3212-4f25-b571-2c57c0259e5b",
				"secondaryProductName":"A VISTA",
				"avaiableBalance":"0",
				"typeName":"VENDA A CREDITO",
				"pan":"******0759",
				"secondaryProductCode":"1",
				"hasSentMerchantCode":"false",
				"documentType":"J",
				"merchantAddress":"AV TESTE 200",
				"statusCode":"2",
				"merchantCode":"000000000",
				"paymentTypeCode":"1",
				"merchantName":"TEST MERCHANT",
				"totalizerCode":"10",
				"applicationId":"pdv.teste",
				"document":"58731662000111"
			},
			"primaryCode":"1000",
			"requestDate":"1699018209429",
			"secondaryCode":"1",
			"terminal":"00876192"
		}
	],
	"pendingAmount":"10",
	"price":"10",
	"reference":"2052023110310274434",
	"releaseDate":null,
	"status":"ENTERED",
	"type":"PAYMENT",
	"updatedAt":"2023-11-03T10:30:17.518Z"
}
Flux of the transaction using the direct payment from Cielo LIO
orderManager.checkoutOrder(orderId, value, primaryCode, secondaryCode, installments, paymentListener);
ABelow there’s an example of the flux with the screens displayed during the installment payment:
Get a warning of cancellation made on LIO
Every time there’s a cancellation on LIP using the launcher, the system sends a broadcast notifying any application that are registered over it. For your application to be notified of a cancellation, update the AndroidManifest.xml file, as on the example below:
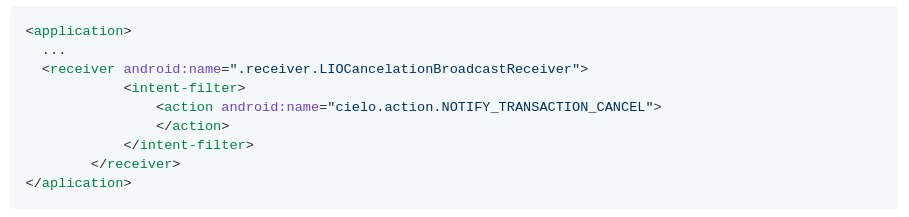
And then, it is required to implement a BroadcastReceiver to treat the event in a way that is pertinent to your application:
public class LIOCancelationBroadcastReceiver extends BroadcastReceiver {

    String MY_CLIENT_ID = "Your client id here";
    String MY_ACCESS_KEY = "Your access key here";

    String INTENT_ORDER_KEY = "ORDER";
    String INTENT_TRANSACTION_KEY = "TRANSACTION";

    @Override
    public void onReceive(Context context, Intent intent) {
        ParcelableOrder order = intent.getExtras().getParcelable(INTENT_ORDER_KEY);

        if(MY_ACCESS_KEY.equalsIgnoreCase(order.getAccessKey()) && MY_CLIENT_ID.equalsIgnoreCase(order.getSecretAccessKey())) {
            ParcelableTransaction transaction  = intent.getExtras().getParcelable(INTENT_TRANSACTION_KEY);
        }
    }
}
Orders Listing
On the orders listing, it is possible to get all orders (Orders) opened on Cielo LIO by the partner’s application. For that, just use the function below, that returns the orders in a paginated way:
//Searches 10 items from the first page
ResultOrders resultOrders = orderManager.retrieveOrders(10, 0);
| ATTRIBUTE | DESCRIPTION | DOMAIN |
|---|---|---|
| pageSize | Amount of items per page | Integer |
| page | Number of the requisitioned page (starting in 0) | Integer |
The ResultOrders object has a list with all orders opened signed with the application credentials..
End the OrderManager use
After performing all the payment operations and in case it is not required using the OrderManager object, use the unbind method to unlink the context and avoid integrity problems.
Pay attention to the local where the unbind() will be executed to avoid problems with the life cycle of the Activity or Fragment that was linked to the service.
it is important to remember that if the context is changed, it is required to unlink the service (example: change of Activity)
Use the method below to end the OrderManager use:
orderManager.unbind();
Terminal informations
All informations referring to the terminal, that were exposed, are available on the InfoManager.
InfoManager infoManager = new InfoManager();
Battery level
To query the LIO’s battery level, just use the method below:
infoManager.getBatteryLevel(context);
The battery value will be returned in a
Floatcontaining the value from 0 to 1 in case of success and -1 in case of error.
Verify LIO model
The SDK provides a method to verify if your application is installed on a LIO V1 or V2. Just access on the following way:
infoManager.getDeviceModel();
It will return an enum of DeviceModel type with the correspondent model (LIO_V1 or LIO_V2).
Getting user informations (CE and Logic Number)
Through the SDK, it is possible to retrieve the data from the customer and the logic number in a simple way using the method below:
infoManager.getSettings(context);
This function will return an object of Settings type, where it is possible to retrieve the user informations. Below, there’s a descriptive of attributes from the Settings object.
| ATTRIBUTE | DESCRIPTION | DOMAIN |
|---|---|---|
| merchantCode | Client code | String |
| logicNumber | LIO Logic Number | String |
Printing [Only LIO V2]
The new version of the LIO V2 allows that partner applications use the methods available on the printer to print important data or necessary to the client’s business. To perform these operations, just use one of the methods listed below, that allows the printing of a single line, a sequence of lines or images.
PrinterManager printerManager = new PrinterManager(context);
Independently on the printing way chosen, you’ll have to use the following callback as parameter to the method of receiving the states related to the printing:
PrinterListener: A callback that informs about all actions taken during the printing process. The following actions can be notified: • onSuccess - When a printing is performed successfully. • onError - When there’s an error on the printing. • onWithoutPaper - When there’s not enough paper to perform the printing.
PrinterListerner printerListener = new PrinterListener() {
    @Override public void onPrintSuccess(int printedLines) {
        Log.d(TAG, "onPrintSuccess");
    }

    @Override public void onError(@Nullable Throwable e) {
        Log.d(TAG, "onError");
    }

    @Override public void onWithoutPaper() {
        Log.d(TAG,"onWithoutPaper");
    }
});
Attention: to change applcation view you should run your callback code inside a runOnUiThread block.
    @Override public void onPrintSuccess(int printedLines) {
        runOnUiThread(new Runnable() {
            @Override
            public void run() {
                showDialog();
            }
        });
    }
Print Styles Map
You can format your printing creating maps of styles using the parameters available:
| Attribute | Description | Values |
|---|---|---|
PrinterAttributes.KEY_ALIGN |
Printing alignment | PrinterAttributes.VAL_ALIGN_CENTER PrinterAttributes.VAL_ALIGN_LEFT PrinterAttributes.VAL_ALIGN_RIGHT |
PrinterAttributes.KEY_TEXTSIZE |
Text size | Whole values |
PrinterAttributes.KEY_TYPEFACE |
Text font | Works with an integer from 0 to 8, where each one is a different font. |
PrinterAttributes.KEY_MARGINLEFT |
Left margin | Whole values |
PrinterAttributes.KEY_MARGINRIGHT |
Right margin | Whole values |
PrinterAttributes.KEY_MARGINTOP |
Superior margin | Whole values |
PrinterAttributes.KEY_MARGINBOTTOM |
Inferior margin | Whole values |
PrinterAttributes.KEY_LINESPACE |
Line spacing | Whole values |
PrinterAttributes.KEY_WEIGHT |
Variable used when working with impression of multiple columns, to choose the weight of each column | Whole values |
Example of Map styles:
HashMap<String, Integer> alignLeft =  new HashMap<>();
alignLeft.put(PrinterAttributes.KEY_ALIGN, PrinterAttributes.VAL_ALIGN_LEFT);
alignLeft.put(PrinterAttributes.KEY_TYPEFACE, 0);
alignLeft.put(PrinterAttributes.KEY_TEXT_SIZE, 20);

HashMap<String, Integer> alignCenter =  new HashMap<>();
alignCenter.put(PrinterAttributes.KEY_ALIGN, PrinterAttributes.VAL_ALIGN_CENTER);
alignCenter.put(PrinterAttributes.KEY_TYPEFACE, 1);
alignCenter.put(PrinterAttributes.KEY_TEXT_SIZE, 20);

HashMap<String, Integer> alignRight =  new HashMap<>();
alignRight.put(PrinterAttributes.KEY_ALIGN, PrinterAttributes.VAL_ALIGN_RIGHT);
alignRight.put(PrinterAttributes.KEY_TYPEFACE, 2);
alignRight.put(PrinterAttributes.KEY_TEXT_SIZE, 20);
Simple text print
To print simple texts, use the printText() method from the PrinterManager.
The method receives as parameter the text to be printed, a printing style map and a listener to treat the printing return.
String textToPrint = "Simple text to be printed.\n With multiple lines";
printerManager.printText(textToPrint, alignLeft, printerListener);
Example of a simple text printing:
| Attribute | Description | Domain |
|---|---|---|
| text | Text to be printed. | String |
| style | Printing styles map | Map<String, Int> |
| printerListener | Printing callback. | cielo.sdk.order.PrinterListener |
Multiple columns printing
o print texts in multiple columns, use the printMultipleColumnText() method of the PrinterManager.
The method receives as parameter an array of texts to be printed, an array with printing styles maps, respectively and a listener to treat the printing return.
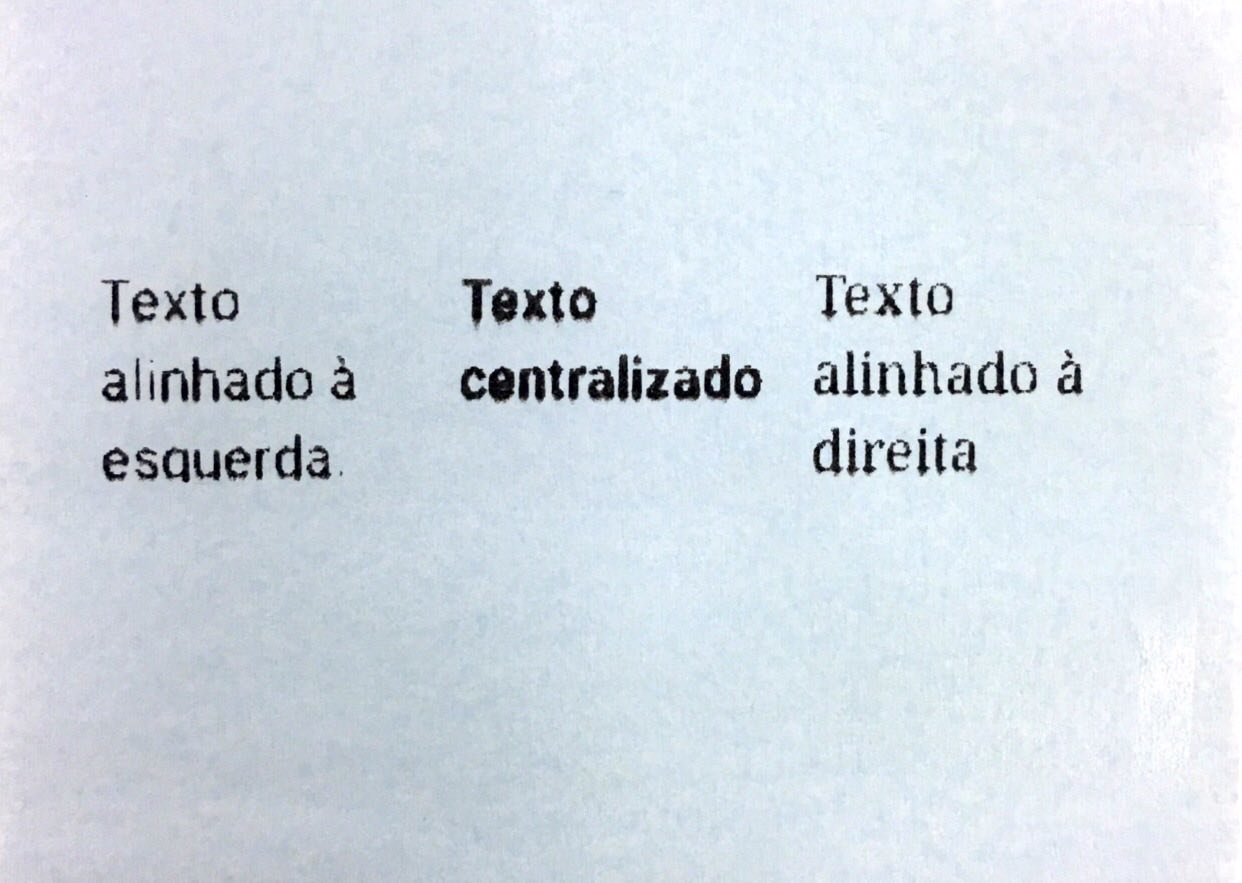
String[] textsToPrint = new String[] { "Text aligned to the left.", "Text centralized", "Text aligned to the right"  }

List<Map<String, Integer>> stylesMap =  new ArrayList<>();
stylesMap.add(alignLeft);
stylesMap.add(alignCenter);
stylesMap.add(alignRight);

printerManager.printMultipleColumnText(textsToPrint, stylesMap, printerListener);
Final printing result:
| Attribute | Description | Domain |
|---|---|---|
| stringArray | List of texts to be printed. | String[] |
| style | List of printing styles map | List<Map<String, Int)>> |
| printerListener | Printing callback. | cielo.sdk.order.PrinterListener |
Image printing
To print images, use the printImage() method of the PrinterManager.
The method receives as parameter the bitmap to be printed, a printing styles map and a listener to treat the printing return.
Bitmap bitmap = BitmapFactory.decodeResource(getResources(), R.drawable.cielo);
printerManager.printImage(bitmap, alignCenter, printerListener);
| Image to be printed | Final result |
|---|---|
 |
 |
| Attribute | Description | Domain |
|---|---|---|
| bitmap | Image to be printed. | Bitmap |
| style | Printing styles map | Map<String, Int> |
| printerListener | Printing callback. | cielo.sdk.order.PrinterListener |
Flux for integration
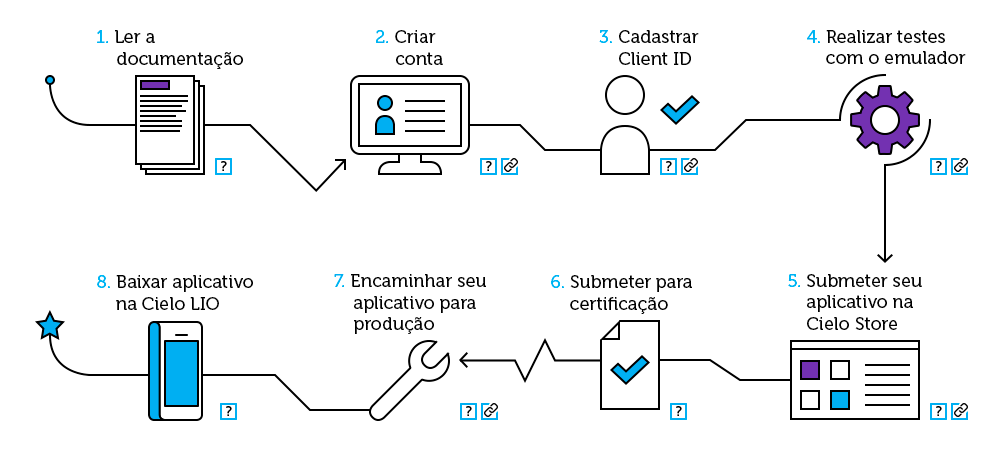
- Read all documentation about the Local Integration.
- Create your account on the Developers Portal from Cielo to get all functionalities that the portal can provide you, developer. It is mandatory to have an account to generate a Client-Id..
- Performing a Client ID register, the developer gets the tokens.
- (Client ID and Access-Token) is able to used the Cielo LIO Order Manager SDK. Perform the tests on the Cielo LIO Emulator. Check the link: Emulator download
- Access Cielo Store and upload your application’s APK. When finishing the upload, submit your app to certification and fill all required information.
- When finishing the upload, submit your app, on the very Cielo Store environment, for certification and fill all required informations.
- As soon as the certification is completed, the developer will get an e-mail and will have to access the Cielo Store again to promote the app for production..
- Now you application is already available for download on Cielo Store. Success! Make the most of everything that the Local Integration from Cielo LIO can provide you!
Release Notes
On the table below, it is possible to verify the SDK available functionalities by version from Cielo LIO and Cielo Mobile..
| Functionality | Cielo LIO version | Cielo Mobile version |
|---|---|---|
| createDraftOrder(String reference); placeOrder(Order order); updateOrder(Order order); checkoutOrder(String orderId, PaymentListener paymentListener); checkoutOrder(String orderId,long value, PaymentListener paymentListener); | 1.10.2 | 1.9.1 |
| retrievePaymentType(); checkoutOrder(String orderId,long value, String primaryCode, String secondaryCode, PaymentListener,paymentListener); | 1.12.0 | 1.10.3 |
| retrieveOrders(int pageSize, int page); | 1.13.0 | 1.10.5 |
| checkoutOrder (String orderId,long value, String primaryCode, String secondaryCode, Long installments, PaymentListener paymentListener); | 1.14.0 | 1.12.1 |
| cancelOrder (Context context, String orderId, Payment payment, CancellationListener paymentListener); cancelOrder(Context context, String orderId, Payment payment, Long amount, CancellationListener paymentListener); | 1.16.7 | 1.12.10 |
Attention: If a functionality that not available is used, it will be launched an exception – UnsupportedOperationExcepetion –, that must be treated by the application.
To find out the Cielo LIO (launcher version) app version and Cielo Mobile, as well as use all functionalities from Cielo LIO Order Manager SDK, access “About Cielo LIO” (Help - > About Cielo LIO) to get the informations about the apps installed on Cielo LIO..
Code Sample
The code sample of the application integrated to the Cielo LIO Order Manager SDK can be found on GitHub.
Demo Video
On the video below, it is possible to check an example of an application integrated to the Cielo LIO Order Manager SDK, using the amount payment feature of the SDK.

Click on the image above to access the video
Remote Integration
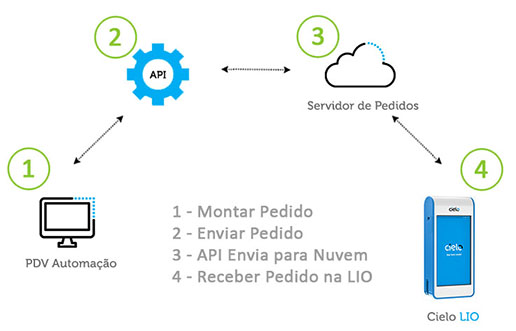
Presentation
The purpose of the Cielo LIO Remote Integration is to allow that the retailer continues on using his cashier front solution (Commercial Automation or PDV) and integrates it to the Cielo LIO payments and orders module through an API built on RESTful standard.
Thus, all commercial establishment management will be under the Commercial Automation responsibility and, at the moment of performing the payment, Cielo LIO is used.
the Cielo LIO Order Manager API has the following characteristics:
- REST features, in a way that it is possible to access through the standard HTTP semantic.
- HTTP status codes to communicate the success/error on the calls.
- All requisitions and answers are in JSON format.
- The sections below have all information required to perform the integration in a fast and safe way.
Demo video
On the video below it is possible to see a sample of Commercial Automation integrated to the Order Manager API from Cielo LIO.

Click on the image above to access the video.
Code Sample
The sample code of the Commercial Automation integrated to the Order Manager API from Cielo LIO is available on GitHub.
Flux for Integration
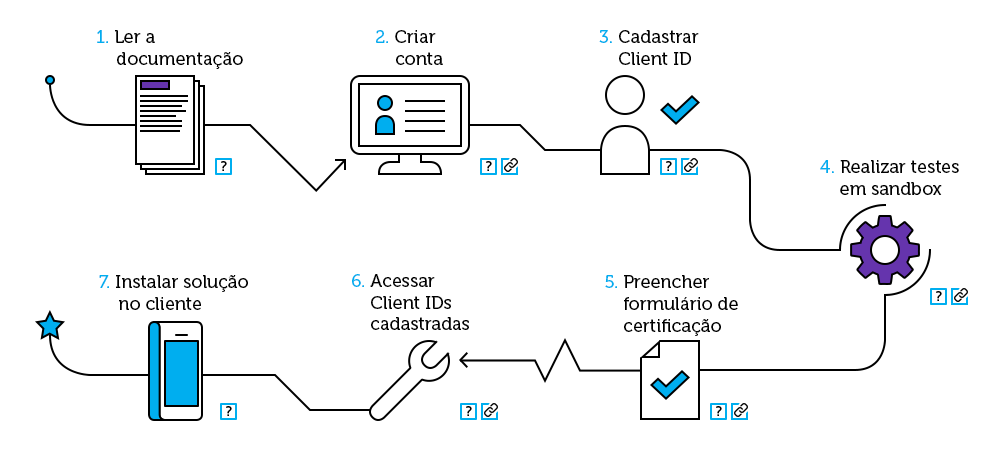
Docs API
In this documentation, the developer finds all information about Endpoints, Entities and Features available on the API.
You’ll be able to query all input data, acquisition examples and output data. As well as understand the basic usage flux of the Cielo Lio’s Order Manager API.
Endpoints
All calls must be executed using the respective credentials from the Sanbox environment and production.
Sandbox
Sandbox environment is destined to tests with Cielo partners. This environment uses integration simulators. Thus, the operations are not executed in productive environment.
To use the Sandbox environment, it is not required that you provide the establishment number. You will be able to start the tests without the need of having a Cielo LIO. To get the sandbox tokens, create an account on the portal and create the Client-Id.
Use the sandbox address below to perform the tests:
https://api.cielo.com.br/sandbox-lio/order-management/v1
Production
The production environment is the transactional environment integrated to the Cielo environment. The operations performed in this environment cannot be undone.
To use the production environment, it is required that you contact through the form. Along with personal data, provide the establishment number. To use the production environment, it is required that you have a Cielo LIO.
Use the production address below to perform the requisitions:
https://api.cielo.com.br/order-management/v1
Have you already done the sandbox tests and wish to request the tokens?
Click on Request Tokens or access the “Developer” menu on the Developers Portal and choose the option “Request tokens”.
You have to be logged in!
HTTP Headers
All Remote Integration Cielo LIO Order Manager API calls require that the information below are present on the requisition Header:
Client-Id: Access ID. Its generation occurs at the moment of the creation by the developer panel. Its value can be viewed on the “Client ID” column, within the menu “Developer” -> “Registered Client ID”.
Access-Token: Access token ID, that stores the access rules allowed to the Client ID. Its generation occurs at the moment of the Client ID generation by the developer panel. Its value can be viewd by clicking on “details” on the “Access Tokens” column, within the menu “Developer” -> “Registered Client ID”.
Merchant-Id: Token that identifies the commercial establishment inside the Order Manager server from Cielo LIO. Its generation occurs during the Client ID registering process. Its value can be viewd on the “Merchant ID” column, withing the menu “Developer” -> “Registered Client ID”.
HTTP Status Code
| Code | Error | Description |
|---|---|---|
| 200 | OK | Operation performed successfully. |
| 201 | Created | The request was performed, resulting on the creation of a new feature. |
| 204 | Empty | Operation performed successfully, but no answer was returned. |
| 400 | Bad Request | The requisition has invalid parameter(s). |
| 401 | Unauthorized | The access token was not informed or does not have access to the APIs. |
| 403 | Forbidden | The access to the feature was denied. |
| 404 | Not Found | The feature informed on request was not found. |
| 413 | Request is too Large | The requisition is surpassing the allowed limit to the profile of your access token. |
| 422 | Unprocessable Entity | The requisition has mandatory parameters non informed. |
| 429 | Too Many Requests | The costumer broke the requisitions limit per time. |
| 500 | Internal Server Error | Not expected error; something is broken on the API |
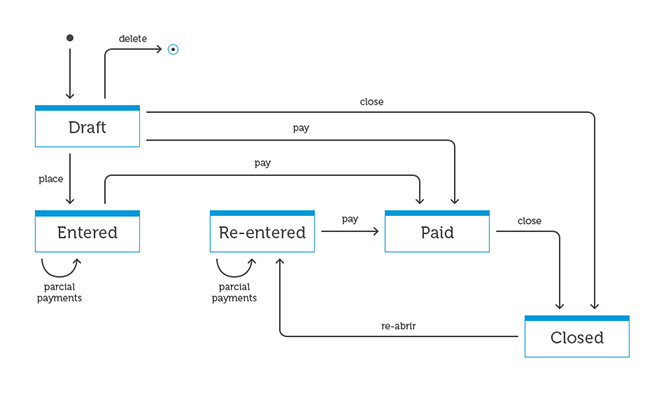
Order status
It is represented a state machine below, with the possible states that an order might assume from the moment of its creation until its end:
Entities
Order
The Order is a representation of an order for sale of one or more products and/or services. It is essential that there’s an Order so that a payment is performed on Cielo LIO.
| Field | Kind | Description | Mandatory |
|---|---|---|---|
| id | Text | UUID that identifies uniquely the order. | created by API |
| number | Text | Order number. Usually, this number represents the order identifier in an external system through integration with partners. | No |
| reference | Text | Order reference. Used to make the order access or location easier. | No |
| status | Text | Status do pedido (ENTERED, RE-ENTERED, PAID, CANCELED and CLOSED). | Yes |
| created_at | Text | Order creation date. Date must be on the following format: YYYY-MM-DDThh:mm:ssZ (Example: 20151020T13:13:29.000Z). | created by API |
| updated_at | Text | Date used on the last order update. Date must be on the following format: YYYY-MM-DDThh:mm:ssZ (Example: 20151020T13:13:29.000Z). | created by API |
| items | List (Order Item) | List of items in the order. | Yes |
| notes | Text | Field available for Merchant use for communication. | No |
| transactions | List (Transaction) | List of payment transactions (or other kinds) effected on the order. | Yes |
| price | Number | Order total value. Example: The value of R$10,00 is represented as 1000. | Yes |
| remaining | Number | Order payment remaining amount. Example: The R$10,00 value is represented as 1000. | Yes |
Order Item
The Order Item is a representation of the items present in an Order. It is mandatory the existence of, at least. one Item for one Order.
| Field | Kind | Description | Mandatory |
|---|---|---|---|
| sku | Text | Product SKU. Example: c2f5fb9a-5542-406e-8b79-17892329cda8. | Yes |
| name | Text | Product name. | No |
| description | Text | Product description. | No |
| unit_price | Number | Unitary product value. Example: The value of R$10,00 is represented as 1000. | Yes |
| quantity | Number | Items amount. In case it is not informed, it will be considered the value 1. | No |
| unit_of_measure | Text | Measuremant unity (EACH, HOURS, DAYS, SECONDS, CRATE_OF_12, SIX_PACK, GALLON e LITRE). | Yes |
| details | Text | Product details. | No |
| created_at | Text | Order creation date. Date must be on the following format: YYYY-MM-DDThh:mm:ssZ (Example: 20151020T13:13:29.000Z). | No |
| updated_at | Text | Date from the last order update. Date must be on the following format: YYYY-MM-DDThh:mm:ssZ (Exemplo: 20151020T13:13:29.000Z). | Yes |
Transaction
Transaction is a representation with all payments performed in an Order. The purpose is to use it to query the payments (transactions) that were made in an Order.
| Field | Kind | Description | Mandatory |
|---|---|---|---|
| id | Text | “UUID” that indetifies uniquely the transaction. | Yes |
| external_id | Text | Unique order identifier. | Yes |
| status | Text | Transaction status (CONFIRMED, PENDING e CANCELLED). | Yes |
| terminal_number | Number | Cielo LIO terminal number in which the payment was performed. | Yes |
| authorization_code | Number | Transaction authorization code. | Yes |
| number | Number | Transaction’s Sequential Unique Number. | Yes |
| amount | Number | Transaction value. Examplo: The value of R$10,00 is represented as 1000. | Yes |
| transaction_type | Text | Kind of transaction (PAYMENT and CANCELLATION). | Yes |
Card
Card is a representation of the card that was used to perform the payment/transaction.
| Field | Type | Description | Mandatory |
|---|---|---|---|
| brand | Text | Card brand (VISA and MASTER). | Yes |
| mask | Number | Masked card number | Yes |
Payment Product
Payment Product is a representation of the payment method used to perform the payment. Example: Credit, Debit, etc.
| Field | Type | Description | Mandatory |
|---|---|---|---|
| primary_product_name | Text | Payment method (CREDIT ou DEBIT) | Yes |
| secondary_product_name | Text | Type of payment (IN ONE LUMP SUM, STORE INSTALLMENT or ADM INSTALLMENT) | Yes |
| number_of_quotas | Number | Number of installments (0 for payments in one lump sum) | Yes |
Recursos
POST - Create an order
This feature performs the creation of an order on the Order Manager server.
Endpoint:
POST /orders
Input data:
| Field | Type | Description | Mandatory |
|---|---|---|---|
| order | Order | Order information. | Yes |
Requisition example:
{
    "number": "0992f1d5cee540d9a9648f4d6a9e4aa6",
    "reference": "ORDER #1234",
    "status": "DRAFT",
    "items": [{
            "sku": "ede8f84a8b8645cb8e576a593c25c6ed",
            "name": "product 1",
            "unit_price": 500,
            "quantity": 2,
            "unit_of_measure": "EACH"
        },
        {
            "sku": "c2f5fb9a5542406e8b7917892329cda8",
            "name": "product 2",
            "unit_price": 1500,
            "quantity": 3,
            "unit_of_measure": "EACH"
        },
        {
            "sku": "b2j4bn6j93461385r5n90453407hjk0",
            "name": "product 3",
            "unit_price": 550,
            "quantity": 3,
            "unit_of_measure": "EACH"
        },
        {
            "sku": "55329cda842406e8cv2f5gdf96985152d",
            "name": "product 4",
            "unit_price": 2005,
            "unit_of_measure": "EACH"
        }
    ],
    "notes": "Table 1",
    "price": 9155
}
Dados de saída:
| Campo | Tipo | Descrição | Obrigatório |
|---|---|---|---|
| id | body | Identificador do pedido. | Sim |
Answer example:
{
    "id": "2e1d7b07-dcee-4a09-8d09-3bb02d94169d"
}
GET - Query an order
This feature is used to get informations about an specific product. The order id is used to perform the call.
Endpoint:
GET /orders
Input data:
| Field | Type | Description | Mandatory |
|---|---|---|---|
| id | path parameter | Order identifier. | Yes |
Requisition example:
GET https://api.cielo.com.br/order-management/v1/orders/c393ce9f-3741-413f-8ad5-2f142eaed51f
Output data:
| Field | Type | Description | Mandatory |
|---|---|---|---|
| order | Order | Informations about the queried order. | No |
Answer example:
{
    {
    "id": "b4d8a7dc-4250-48a3-bf18-d560d4508368",
    "number": "0992f1d5-cee5-40d9-a964-8f4d6a9e4aa6",
    "reference": "JUICE STORE #1",
    "status": "ENTERED",
    "notes": "Table 6",
    "price": 5250,
    "created_at": "2016-09-06T19:09:49Z",
    "updated_at": "2016-09-06T19:09:49Z",
    "order_type": "PAYMENT",
    "merchant": "0010920335960001",
    "source_id": "4QeQD63ZeKsz",
    "items": [{
            "id": "0687f00a-0aea-48f7-85d0-64bc31977734",
            "sku": "0000001",
            "name": "Detox Juice",
            "unit_price": 800,
            "quantity": 1,
            "unit_of_measure": "EACH"
        },
        {
            "id": "cf561196-4e4c-436b-816b-80190e9a705f",
            "sku": "0000010",
            "name": "Grape juice",
            "unit_price": 450,
            "quantity": 5,
            "unit_of_measure": "EACH"
        },
        {
            "id": "16b4b10b-9967-477b-91a2-ecc02e6ff40c",
            "sku": "0000011",
            "name": "Tomato juice",
            "unit_price": 500,
            "quantity": 2,
            "unit_of_measure": "EACH"
        },
        {
            "id": "8500c747-1740-47cf-908a-3ab0f8b44193",
            "sku": "0000100",
            "name": "Pineapple juice",
            "unit_price": 400,
            "quantity": 3,
            "unit_of_measure": "EACH"
        }
    ],
    "transactions": []
}
}
GET - Query all Orders
This feature is used to get the list and the information of all orders registered on the Order Manager.
Endpoint:
GET /orders/
Input data:
| Field | Type | Description | Mandatory |
|---|---|---|---|
| N/A |
Requisition example:
GET https://api.cielo.com.br/order-management/v1/orders/
Output data:
| Field | Tipo | Type | Mandatory |
|---|---|---|---|
| order | Order | Information about the queried order. | No |
Answer example:
{
    "id": "b4d8a7dc-4250-48a3-bf18-d560d4508368",
    "number": "0992f1d5-cee5-40d9-a964-8f4d6a9e4aa6",
    "reference": "JUICE STORE #1",
    "status": "ENTERED",
    "notes": "Table 6",
    "price": 5250,
    "created_at": "2016-09-06T19:09:49Z",
    "updated_at": "2016-09-06T19:09:49Z",
    "order_type": "PAYMENT",
    "merchant": "0010920335960001",
    "source_id": "4QeQD63ZeKsz",
    "items": [{
            "id": "0687f00a-0aea-48f7-85d0-64bc31977734",
            "sku": "0000001",
            "name": "Detox Juice",
            "unit_price": 800,
            "quantity": 1,
            "unit_of_measure": "EACH"
        },
        {
            "id": "cf561196-4e4c-436b-816b-80190e9a705f",
            "sku": "0000010",

            "name": "Grape Juice",
            "unit_price": 450,
            "quantity": 5,
            "unit_of_measure": "EACH"
        },
        {
            "id": "16b4b10b-9967-477b-91a2-ecc02e6ff40c",
            "sku": "0000011",
            "name": "Tomato juice",
            "unit_price": 500,
            "quantity": 2,
            "unit_of_measure": "EACH"
        },
        {
            "id": "8500c747-1740-47cf-908a-3ab0f8b44193",
            "sku": "0000100",
            "name": "Pineapple juice",
            "unit_price": 400,
            "quantity": 3,
            "unit_of_measure": "EACH"
        }
    ],
    "transactions": []
}
PUT- Change status order
Thia feature performs the status change of a created order. The order id is used to perform the call.
The possible status changes are:
- PLACE (Release an order for payment, display an order on Cielo LIO)
- PAY (Change an order to paid)
- CLOSE (Close an order)
Endpoint:
PUT /orders/?operation=
Input data:
| Field | Type | Description | Mandatory |
|---|---|---|---|
| id | path parameter | Order identifier. | Yes |
| operation | query parameter | Operation that must be performed. The possible operations are:: place (Release an order for payment), pay (set an order as paid) and close (Close an order). | Yes |
Requisition example:
PUT https://api.cielo.com.br/order-management/v1/orders/db815e66-e5b6-497c-8444-2120cc87d33a?operation=PLACE
Output data:
| Field | Type | Description | Mandatory |
|---|---|---|---|
| N/A |
Answer example:
N/A
The return 200 of this operation represents success on the requisition.
DELETE - Delete an order
This feature is used to delete an order from the Order Manager server. The order id is used to perform the call.
Only orders with DRAFT status can be deleted.
Endpoint:
DELETE /orders/
Input data:
| Field | Type | Description | Mandatory |
|---|---|---|---|
| id | path parameter | Order identifier | Yes |
Requisition example:
DELETE https://api.cielo.com.br/order-management/v1/orders/db815e66-e5b6-497c-8444-2120cc87d33a
Output data:
| Field | Type | Description | Mandatory |
|---|---|---|---|
| N/A |
Answer example:
N/A
The return 200 of this operation represents success on the requisition.
POST - Add Item/Items in an Order
This feature is used to add one or more items in an already created order. The order id is used to perform the call.
Only the orders with DRAFT status can be deleted.
Endpoint:
POST /orders//items
Input data:
| Field | Type | Description | Mandatory |
|---|---|---|---|
| id | path parameter | Order identifier. | Yes |
Requisition example:
{
    "sku": "ede8f84a8b8645cb8e576a593c25c6ed",
    "name": "product 1"
    "unit_price": 500,
    "quantity": 2,
    "unit_of_measure": "EACH"
}
Output data:
| Field | Type | Description | Mandatory |
|---|---|---|---|
| N/A |
Answer example:
N/A
The return 200 of this operation represents success on the requisition.
GET - Query the items of an order
This feature is used to query the items present in an order. The order id is used to perform the call.
Endpoint:
GET /orders//items
Input data:
| Field | Type | Description | Mandatory |
|---|---|---|---|
| id | path parameter | Order identifier. | Yes |
Requisition example:
GET https://api.cielo.com.br/order-management/v1/orders/c393ce9f-3741-413f-8ad5-2f142eaed51f/items
Output data:
| Field | Type | Description | Mandatory |
|---|---|---|---|
| orderItems | (OrderItem) list | Items list of an order. | Yes |
Answer example:
[{
        "id": 1,
        "sku": "ede8f84a8b8645cb8e576a593c25c6ed",
        "name": "product 1"
        "unit_price": 500,
        "quantity": 2,
        "unit_of_measure": "EACH"
    },
    {
        "id": 2,
        "sku": "c2f5fb9a5542406e8b7917892329cda8",
        "name": "product 1"
        "unit_price": 1500,
        "quantity": 3,
        "unit_of_measure": "EACH"
    }
]
PUT - Change an item in an order
This feature allows to change information from an order’s item. The order id and the id_item are used to perform the call.
Only orders with DRAFT status can be changed.
Endpoint:
PUT /orders//items/
Input data:
| Field | Type | Description | Mandatory |
|---|---|---|---|
| id | path parameter | Order identifier. | Yes |
| id_item | path parameter | Order item identifier. | Yes |
Requisition example:
PUT https://api.cielo.com.br/order-management/v1/orders/a9398720-9f78-4fa4-a5d4-ba54ba8009e7 /items/8484df74-eca6-4850-8e4c-35653af0bd31
{
    "sku": "ede8f84a8b8645cb8e576a593c25c6ed",
    "unit_price": 500,
    "quantity": 2,
    "unit_of_measure": "EACH"
}
Output data:
| Field | Type | Description | Mandatory |
|---|---|---|---|
| N/A |
The return 200 of this operation represents success on the requisition.
DELETE - Delete an order’s Item
This feature is used to delete an item present in an order. The order id and the id_item are used to perform the call.
Only orders with DRAFT status can have items changed.
Endpoint:
DELETE /orders//items/
Input data:
| Field | Type | Description | Mandatory |
|---|---|---|---|
| id | path parameter | Order identifier. | Yes |
| id_item | path parameter | Order’s item identifer. | Yes |
Requisition example:
DELETE https://api.cielo.com.br/order-management/v1/orders/a9398720-9f78-4fa4-a5d4-ba54ba8009e7/items/8484df74-eca6-4850-8e4c-35653af0bd31
Output data:
| Field | Type | Description | Mandatory |
|---|---|---|---|
| N/A |
The return 200 of this operation represents success on the requisition.
POST - Add a Transaction
Feature used only for Sandbox Environment
This feature allows that the developer simulates the financial transactions, manually adding them, being possible to understand the working in an Order.
Endpoint:
POST /orders//transactions
Input data:
| Field | Type | Description | Mandatory |
|---|---|---|---|
| Transactions | (Transaction) list | Transaction informations | Yes |
Requisition example:
POST https://api.cielo.com.br/order-management/v1/orders/a9398720-9f78-4fa4-a5d4-ba54ba8009e7/transactions
{
  "id": "442bbdbe-41c8-4e22-83ee-e1a849ed3cb5",
  "external_id": "0b37f0d8-017a-4b11-91b9-ec1bb3e8fed3",
  "status": "CONFIRMED",
  "terminal_number": "12345678",
  "authorization_code": "008619",
  "number": "672836",
  "amount": 2000,
  "transaction_type": "PAYMENT",
  "payment_fields": {
    "primary_product_name": "CREDIT",
    "secondary_product_name": "IN ONE LUMP SUM",
    "number_of_quotas": 0
  },
  "card": {
    "brand": "VISA",
    "mask": "************5487"
  }
}
Output data:
| Field | Type | Description | Mandatory |
|---|---|---|---|
| id | number | Transaction Identifier | YES |
{
id: "00219dd0-1c13-46da-91e5-1c313f0d2e83"
}
In Sandbox environment, where there’s no need of having a Cielo LIO, and consequently is not required to have an establishment number, it does make sense to perform this call of this feature..
As for the Production environment, Cielo LIO itself will be responsible for creating the transactions, as the payments are effected.
GET - Query the transactions of an order
This feature is used to get the informations of all transactions performed in an order. The order id is used to perform the call. In production environment, once the payment is performed on Cielo LIO, the transactions will be automatically added on the order and then, it will be possible to get the informations about the payment performed from the call of this feature.
Endpoint:
GET /orders//transactions
Input data:
| Field | Type | Description | Mandatory |
|---|---|---|---|
| id | path parameter | Order identifier. | Yes |
Requisition example:
GET https://api.cielo.com.br/order-management/v1/orders/c393ce9f-3741-413f-8ad5-2f142eaed51f/transactions
Output data:
| Field | Type | Description | Mandatory |
|---|---|---|---|
| transactions | (Transaction) list | Order’s transaction list. | YES |
Answer example:
[
{
  "id": "442bbdbe-41c8-4e22-83ee-e1a849ed3cb5",
  "external_id": "0b37f0d8-017a-4b11-91b9-ec1bb3e8fed3",
  "status": "CONFIRMED",
  "terminal_number": "77102648",
  "authorization_code": "008619",
  "number": "672836",
  "amount": 2000,
  "transaction_type": "PAYMENT",
  "payment_fields": {
  "primary_product_name": "CREDIT",
  "secondary_product_name": "ONE LUMP SUM",
    "number_of_quotas": 0
  },
  "card": {
    "brand": "VISA",
    "mask": "************3542"
  }
}
]
Cancel Orders
The order cancellation is performed only through Cielo LIO. Select the Sales Cancellation feature and enter the company’s CNPJ (the same that can be visualized through the payment receipt), The system will require a password to perform the operation, that can be obtained through the opening of ticket on the Developers Portal Support. Follow all steps indicated on the following screens to perform the sales cancelling. It is important to emphasize that a cancellation can only be performed in its integral value. .
GET - Query canceled transactions of an order
This feature is used to get the informations of all transactions canceled in an order. The order id is used to perform the call. In production environment, once the cancellation is performed on Cielo Lio the transactions will be automatically added on the order along with the original payment transaction.
Endpoint:
GET /orders//transactions
Input data:
| Field | Type | Description | Mandatory |
|---|---|---|---|
| id | path parameter | Identificador do pedido. | Sim |
Exemplo de requisição:
GET https://api.cielo.com.br/order-management/v1/orders/c393ce9f-3741-413f-8ad5-2f142eaed51f/transactions
Dados de saída:
| Field | Type | Description | Mandatory |
|---|---|---|---|
| transactions | (Transaction) list | Transactions list of an order. | YES |
Answer example:
[
  {
    "id": "46019c39-989e-46e9-aa7d-d8e9414396b4",
    "external_id": "95185.99407021694",
    "status": "CONFIRMED",
    "terminal_number": "77102648",
    "authorization_code": "008619",
    "number": "672837",
    "amount": 2000,
    "transaction_type": "CANCELLATION",
    "payment_fields": {
    "primary_product_name": "CREDIT",
    "secondary_product_name": "",
    "number_of_quotas": 0
  },
    "card": {
      "brand": "VISA",
      "mask": "************3542"
    }
  },
  {
    "id": "442bbdbe-41c8-4e22-83ee-e1a849ed3cb5",
    "external_id": "0b37f0d8-017a-4b11-91b9-ec1bb3e8fed3",
    "status": "CONFIRMED",
    "terminal_number": "77102648",
    "authorization_code": "008619",
    "number": "672836",
    "amount": 2000,
    "transaction_type": "PAYMENT",
    "payment_fields": {
    "primary_product_name": "CREDIT",
    "secondary_product_name": "ONE LUMP SUM",
    "number_of_quotas": 0
   },
    "card": {
    "brand": "VISA",
    "mask": "************3542"
    }
  }
]
Basic Flux Usage Cielo LIO Order Manager API
Below you can find a basic flux to send an order to Cielo LIO using the Remote Integration:
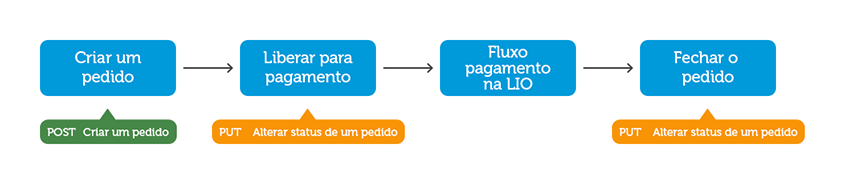
Changes Notifications on the Order
The biggest reason for the Order Manager’s RESTful API availability is to allow partner applications to integrate to Cielo’s cloud platform. However, once partner applications submit orders, they must be paid locally at Cielo LIO. Therefore, partner applications need a way to receive status changes notifications and from transactions performed in the Order.
For such, it is required that the partner makes available a RESTful Backend, that will get the notifications following the format below. Once the informations are received, the Backend has the liberty to be used on the most appropriate way to the business model.
PUT - Status Change Notification
In each status notification in an order, the Order Manager server sends, via command, the informations to the partner’s Backend.
Order Manager Requisition
PUT
Example of information sent by Order Manager
{
  "id": "f9a9e3c0d31445f7ac419642651f0a52",
  "order_id": "ede8f84a8b8645cb8e576a593c25c6ed",
  "type": "STATUS_CHANGED",
  "status": {
    "old": "ENTERED",
    "new_status": "PAID"
  }
}
PUT - Performed Transaction Notification
In each transaction/payment performed in an order, the Order Manager server sends, via command, the information to the partner’s Backend.
Order Manager Requisition
PUT
Example of information sent by the Order Manager
{
  "id": "c7b1dfc39f59436fbc55db8b4e360a96",
  "order_id": "ede8f84a8b8645cb8e576a593c25c6ed",
  "type": "TRANSACTION_ADDED",
  "transaction": {
    "id": "ede8f84a8b8645cb8e576a593c25c6ed",
    "transaction_type": "PAYMENT",
    "status": "CONFIRMED",
    "terminal_number": "928273921",
    "card": {
      "brand": "VISA",
      "bin": "490172",
      "last": "7897"
    },
    "number": "1234589",
    "authorization_code": "22388292",
    "payment_product": {
      "number": 928282,
      "name": "CREDIT",
      "sub": {
        "number": 928282,
        "name": "ONE LUMP SUM"
      }
    },
    "amount": 5000,
    "created_at": "20151020T13:13:29.000Z",
    "updated_at": "20151022T12:13:29.000Z"
  }
}
Order Notifications
Retry Policy
- Order notifications are triggered every 15 minutes in a period of 7 hours.
- Therefore, after 28 unsuccessful retries, all orders’ notifications are blocked.
- The remaining orders follow the same policy.
Merchant’s notifications Blocking
- The merchant won’t have notifications when the percentage of blocked orders is equal to or greater than 80% in the last 24 hours.
Unlocking Merchant’s notifications
- Contact us and submit an unlock request providing the merchant’s reference and the details you consider essential to solve the issue.
Cielo Store
About
Cielo Store is the app store from Cielo LIO.
It was an environment created for partners, software companies and developers to create their apps, publish and make their apps available on Cielo Store for them to be used by clients that use the Cielo LIO platform.
The retailer will be able to access the Cielo Store through Cielo LIO and download the apps that better attend their business model and that have the purpuse of making the management and sales control easier, improve their relationship with the costumers and boost their sales.
The developers will be able to access the Dev Console to perform the publishing of their apps and make them available on Cielo Store.
Architecture
To understand the Cielo Store architectuer, it is required to understand the 3 concepts below:
-
Dev Console Exclusive environment for the developer to upload his applications. Learn more
-
Own applications Applications developed to be distributed to specific clients. The own applications will not be available for download on Cielo Store. Learn more
-
Private Store Specific model used for the distribution of own apps to the retailers. Learn more
-
Public Applications Applications developed to be available on the Cielo Store app store. These applications will be able to be downloaded by commercial establishments (retailers) accessing the Cielo Store via Cielo LIO. Learn more